Tuesday, December 23, 2014

RecyclerView: Autofit grid

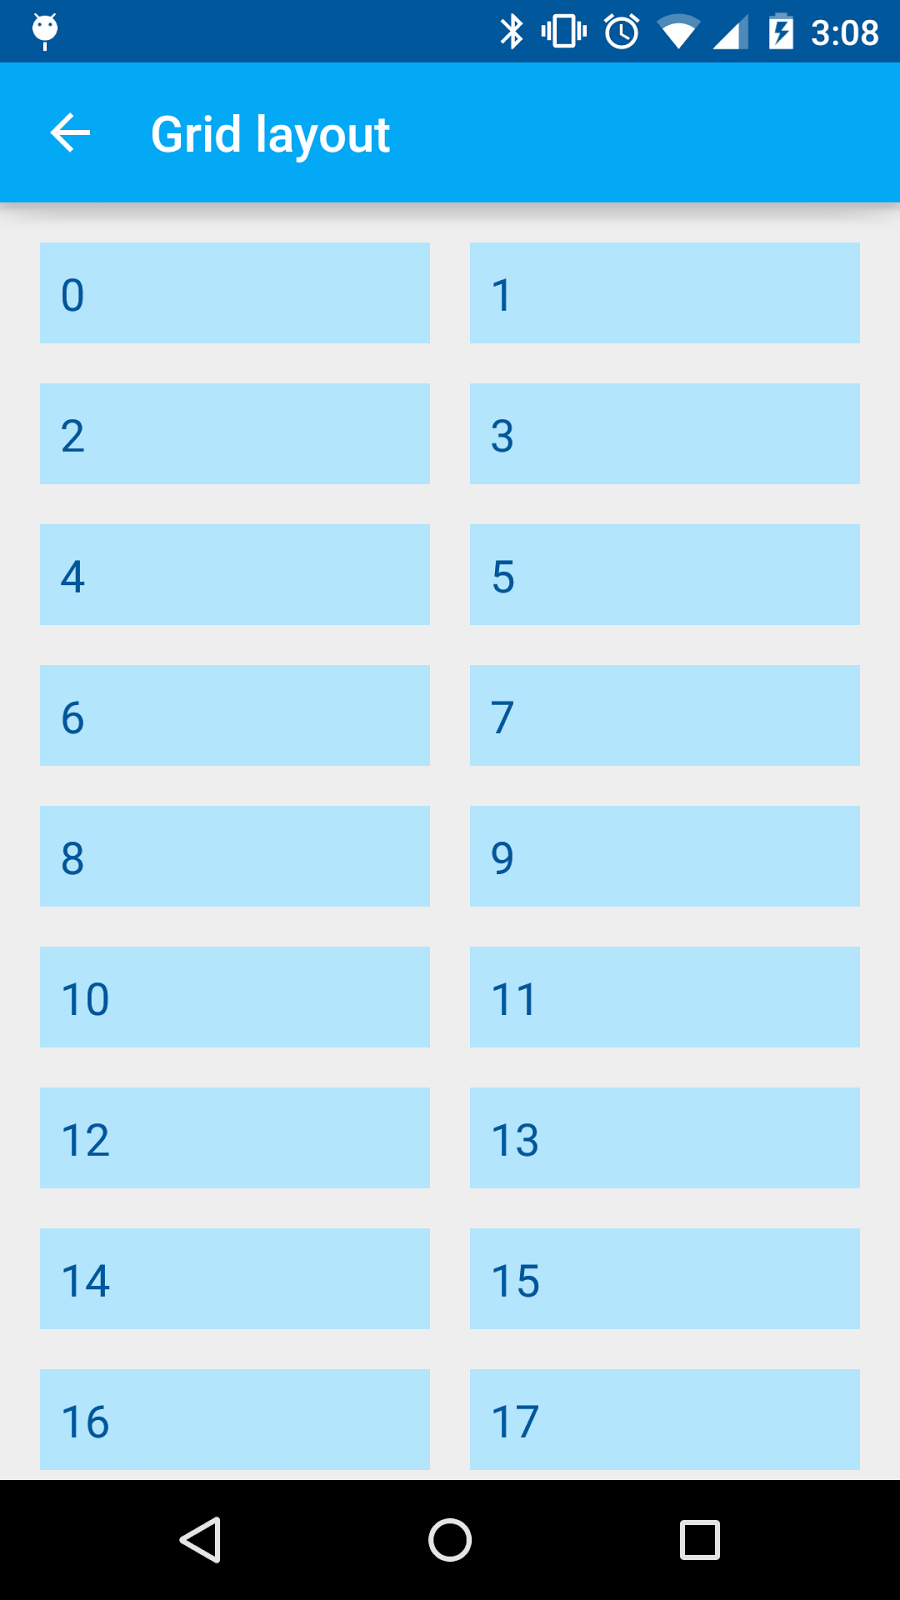
After I made a RecyclerView grid with a header, I realized that I want to make it auto fit as well. I want to define the size of each item and let the system compute the spanCount automatically.

To determine the number of spans, I need two things: the width of the RecyclerView, and the width of each item.

AutofitRecyclerView

We extend RecyclerView to get access to its width. As for the width of each item, when GridView has android:numColumns="auto_fit", it uses android:columnWidth to compute the number of columns. Let's reuse that attribute.

private void init(Context context, AttributeSet attrs) {
  if (attrs != null) {
    int[] attrsArray = {
        android.R.attr.columnWidth
    };
    TypedArray array = context.obtainStyledAttributes(
      attrs, attrsArray);
    columnWidth = array.getDimensionPixelSize(0, -1);
    array.recycle();
  }

  manager = new GridLayoutManager(getContext(), 1);
  setLayoutManager(manager);
}

In the constructor, we read the value of android:columnWidth and save it in a member variable. Later in onMeasure will will use it to determine the span count.

Even though we will be setting the span count in onMeasure, the app will crash if we wait until then to define a GridLayoutManager, so we create one here as well, with a span count of 1.

In onMeasure, we ask the super class to perform the measurement, then take the value from getMeasuredWidth to compute the span count.

protected void onMeasure(int widthSpec, int heightSpec) {
  super.onMeasure(widthSpec, heightSpec);
  if (columnWidth > 0) {
    int spanCount = Math.max(1, getMeasuredWidth() / columnWidth);
    manager.setSpanCount(spanCount);
  }
}

Notice the Math.max call? This makes sure that we will have at least a span count of 1, even if the column width is defined to be larger than the width of the RecyclerView.

With that, the span count changes with the width of the RecyclerView.

One thing to note: we are using the column width the compute the span count, and once that is given to the RecyclerView it will turn around and compute the width of each item. So for instance if your RecyclerView is 320dp wide and you use a column width of 72dp, a span count of 4 (320dp / 72dp = 4.4444) will be given to the RecyclerView, which will make your items 320dp / 4 = 80dp wide, not 72dp. Make sure your item layout takes that into account.

Source: https://github.com/chiuki/android-recyclerview

Why bother?

Since GridView already supports auto fit, why bother reimplementing it using RecyclerView? RecyclerView has a lot of other functionalities like built-in animations for inserting and removing items, reordering etc, so you may want to use that instead of GridView.

Sunday, December 21, 2014

RecyclerView: Grid with header

GridView shares a lot of features with ListView, with one noticeable difference: no headers or footers. Now they are unified under RecyclerView, and I want to see how I can add a header to a grid.

GridLayoutManager

I created a RecylcerView using a GridLayoutManager with a spanCount of 2.

RecyclerView recyclerView = (RecyclerView) findViewById(
    R.id.recycler_view);
recyclerView.addItemDecoration(new MarginDecoration(this));
recyclerView.setHasFixedSize(true);
recyclerView.setLayoutManager(new GridLayoutManager(this, 2));
recyclerView.setAdapter(new NumberedAdapter(30));

NumberedAdapter shows the position of the item as string, and toasts when clicked.

Variable span size

In the basic setup I have a spanCount of 2, each item with a span size of 1. A header will need a span size of 2 instead. Before I try to add a header, I want to see how I can change the span size. Turns out to be fairly easy.

GridLayoutManager manager = new GridLayoutManager(this, 3);
manager.setSpanSizeLookup(new GridLayoutManager.SpanSizeLookup() {
  @Override
  public int getSpanSize(int position) {
    return (3 - position % 3);
  }
});
recyclerView.setLayoutManager(manager);

setSpanSizeLookup lets you change the span size according to the position. This formula gives me span sizes 3, 2, 1, 3, 2, 1...

Header

Now let's add a header! We will need an adapter that providers two view types, one the header and one for the items. Take a look at HeaderNumberedAdapter, which takes a View as the header in the constructor and stash it away in a member variable.

public boolean isHeader(int position) {
  return position == 0;
}

@Override
public TextViewHolder onCreateViewHolder(
    ViewGroup parent, int viewType) {
  if (viewType == ITEM_VIEW_TYPE_HEADER) {
    return new TextViewHolder(header);
  }
  View view = LayoutInflater.from(parent.getContext())
    .inflate(R.layout.item, parent, false);
  return new TextViewHolder(view);
}

@Override
public void onBindViewHolder(
    final TextViewHolder holder, final int position) {
  if (isHeader(position)) {
    return;
  }

  // Subtract 1 for header
  final String label = labels.get(position - 1);

  holder.textView.setText(label);
  holder.textView.setOnClickListener(new View.OnClickListener() {
    @Override
    public void onClick(View v) {
      Toast.makeText(holder.textView.getContext(), 
          label, Toast.LENGTH_SHORT).show();
    }
  });
}

@Override
public int getItemViewType(int position) {
  return isHeader(position) ? 
    ITEM_VIEW_TYPE_HEADER : ITEM_VIEW_TYPE_ITEM;
}

@Override
public int getItemCount() {
  return labels.size() + 1;
}

When the RecyclerView creates a view, if we are at the header position we wrap the stashed header with the view holder. On bind does not need to do anything for the header since the logic is done in the activity. However, we need to subtract the position by 1 when we bind the remaining items.

Back to the activity. We need to initialize the HeaderNumberedAdapter with a header, and also override the setSpanSizeLookup to have the header span all the columns.

final GridLayoutManager manager = new GridLayoutManager(this, 2);
recyclerView.setLayoutManager(manager);

View header = LayoutInflater.from(this).inflate(
    R.layout.header, recyclerView, false);
header.setOnClickListener(new View.OnClickListener() {
  @Override
  public void onClick(View v) {
    Toast.makeText(v.getContext(), R.string.grid_layout_header, 
        Toast.LENGTH_SHORT).show();
  }
});
final HeaderNumberedAdapter adapter 
    = new HeaderNumberedAdapter(header, 30);
recyclerView.setAdapter(adapter);

manager.setSpanSizeLookup(new GridLayoutManager.SpanSizeLookup() {
  @Override
  public int getSpanSize(int position) {
    return adapter.isHeader(position) ? manager.getSpanCount() : 1;
  }
});

We inflate the header, define its click behavior, and use it to construct the adapter. Then, in setSpanSizeLookup, we return the span count as the span size if we are at the header position.

Summary

To create a grid with header using RecyclerView:

  1. Define an adapter with two view types, one for the header and one of the items.
  2. Inflate a header and pass it to the adapter.
  3. Override setSpanSizeLookup in GridLayoutManager to return the span count as the span size for the header.

Source: https://github.com/chiuki/android-recyclerview

P.S.: I got a comment on my Google+ post that you can also copy HeaderGridView.java out of AOSP if you don't need other RecyclerView functionalities such as animation, reordering and staggering.

Tuesday, November 25, 2014

AnDevCon SF 2014

I can't believe this is my fifth AnDevCon already! This time I am living in Colorado, so Burlingame is no longer local. But as luck would have it the GDE Summit is one the same week at the Google headquarters, and I got to combine the two trips. The flip side is that they overlap quite a bit, and I ended up only attending the last two days of AnDevCon, plus the fireside chat Wednesday evening.

Fireside chats

There were two fireside chats / panel discussions at this AnDevCon, both very informative and entertaining:

Sessions

I didn't go to many sessions, partly because I was only there for two days, but partly because each session is 75 minutes long. After subtracting time for keynotes and sponsor sessions, there was really only time for 3 to 4 sessions a day. Since I was giving two sessions myself, I ended up only going to 5 sessions.

My talks

My two talks were back-to-back on Friday morning. First I had Advanced Android TextView at 8:30am.

I gave the 40-minute talk at Øredev, but the audience reaction was quite different. Here I was among Android developers, and people jumped in with interesting questions pretty much right away. I loved that! I was having a great good discussion off stage afterwards as well, but had to cut it short since I needed to run to another room to give another talk.

My next talk, Fun with Android Shaders and Filters, was in the Regency ballroom. Quite a different experience to present from a stage.

The crowd was a bit larger, not sure if it was 10am vs 8:30am, or people were more interested in graphics. In any case, both talks went very well!

RxJava

RxJava is quite hot among in Android world, and I am very curious about it. I attended a talk at Droidcon London but didn't quite get what it is, so I tried again with a session at AnDevCon. Alas:

This time I got a bit further: I understood that RxJava builds on the concept of asynchronous sequences, and as a result you can apply many operations on them. That's why there were all these marble diagrams for map, filter etc. I think I should give up on trying to learn it by listening to a talk though, and instead get my hands dirty with tutorials:

Tips on building SDKs

AnDevCon ended on a great session from Ty Smith sharing his experience building the Fabric SDK, filled with tips and insights.

Check out the video for the full talk.

New speakers

I am very happy to see new speakers at AnDevCon, sharing their knowledge with everyone. Do you work on Android? If so, submit a talk!

Tuesday, November 18, 2014

Android Stacked Fractions

I read about a small new feature on TextView in Android Lollipop:

I never heard of CSS font-feature-settings, but a quick internet search led me to a sandbox, where I can play with OpenType font features such as kerning and ligature. Not particularly exciting, but then I scrolled down the list and saw fractions. I experimented with different settings and came up with this:

Stacked fractions! Let's put that in a TextView.

First, I need a font that supports afrc. I chose Nutso2, an Apache 2 licensed font.

I first tried to set font settings on the whole TextView:

Typeface typeface = Typeface.createFromAsset(
    getAssets(), "Nutso2.otf");
textView.setTypeface(typeface);
textView.setText("1/2 2/5");
textView.setFontFeatureSettings("afrc");

Looks good. But then I want to display one and a half. If I set text as "1 1/2" there is a space, and if I use "11/2" it shows eleven over two. What to do?

I went back to the Nutso project for their demo page:

1<span class="afrc">1/2</span>

HTML with span, eh? Why yes, I can do that in Android! We'll need a TagHandler with a custom Span.

1<afrc>1/2</afrc>

The TagHandler is called twice: at the start of the span, again at the end. We mark the beginning of the tag with a Spannable.SPAN_MARK_MARK so we can retrieve it at the end of the span. With that we have the start and end positions of our stacked fraction, and we can apply our FractionSpan to activate the afrc font feature settings.

Now we have mixed fractions, no space. Yay!

Source: https://github.com/chiuki/advanced-textview (FractionActivity)

To hear about this and other cool TextView tricks, come to my Advanced Android TextView talk at AnDevCon this Friday!

Thursday, November 13, 2014

Øredev: a superbly run conference

Technically Speaking

When Cate and I was touring Copenhagen, we talked about how we got into public speaking. One thing led to another, and we decided to publish a newsletter together. We had a little bit of time on Monday before Øredev, so we put together our first issue in the hotel lobby!

Sauna, bus tour, glögg and the city hall

After we prepared our newsletter we met the organizers and other speakers to head to Kallbadhuset, a Swedish bath house perched on top of the Baltic Sea. We had an appetizer (herring!), went into the sauna (hot!), dipped in the Baltic Sea (cold!), and then had dinner (more fish!). My first night in Sweden, and it was definitely super Swedish.

And that was just the start of the speaker activities. Tuesday they organized three things for us, starting with a bus tour of the city of Malmö. I signed up for the 3pm tour so I had the morning free, and grabbed Cate to see the astronomical clock in Lund.

Later in the evening, we had a pre-dinner event with glögg (glüewine) and pepparkaka (ginger bread cookies), and an acapella performance!

Then we moved to the City Hall, where we were addressed by the mayor of Malmö, and dined in this beautiful hall.

The conference

The conference started on Wednesday, with three days, eight tracks, more than 150 sessions total. With so many simultaneous talks, I had to make a choice every hour, and I came up with a strategy. I prioritize talks with:

  1. Great speakers
  2. Props
  3. Technology that I would not look into otherwise

Great speakers

James Mickens definitely falls under the "great speakers" category. His talk was hilarious!

Christian Heilmann explained why we are not using HTML5, with great visuals.

Props

In the "props" category I have The Internet of Things Magic Show and Oculus Rift.

Great insights

Lots of great insights on how we interact with computers:

Celebrity

To top it off, Øredev invited Nile Rodgers for a candid chat!

A superbly run conference

Øredev is the best run conference I have ever been to. The attention to detail is amazing.

A round badge! With a lens in it!

The podium seen through the Øredev lens.

Sign posts pointing to the rooms. Much easier to see than signs on walls, which they also had.

A smoke screen!

Lightweight feedback screen at the door of each room.

Other impressive things:

  • There were at least 20 minutes between the sessions, so even if one session ran overtime it wouldn't eat up time from the next session. Also gave you time to hang out in the hallway and talk to people, grab a coffee etc.
  • Speaking of coffee, there were plenty of food: breakfast, lunch, snacks, and dinner!
  • And they treat their speakers really well. All travel costs are covered, and they pampered us with so many speaker activities.
  • Finally, all sessions are recorded, and uploaded right away. They were so efficient, I don't even know how they did that.

Here are my two talks:

Tack så mycket, Øredev!

Copenhagen

After speaking at Droidcon London, I flew to Copenhagen to speak at Øredev.

Even though Øredev is in Sweden, you get there by flying to Denmark. This is because Malmö, its host city, is only 20 minutes by train from the Copenhagen airport. Since I have never been to Denmark before, I spent the weekend sightseeing in Copenhagen. My friend Cate is also speaking at Øredev, and we toured Copenhagen together.

I was sustained by conference high during my two-and-a-half-day stay in London. But come Saturday I crashed hard, and was pretty much unconscious the whole flight from London to Copenhagen. To combat my jet lag, we walked almost 3km the to see the Little Mermaid.

We also went to Kastellet, the star fortress next to Little Mermaid. But it was so foggy and gloomy that I didn't have any good photos.

The sky cleared up a bit the next day so I took more photos.

We walked to the Glyptotek museum to see Degas' ballerina. I really like the indoor courtyard.

Breakfast was really late since I slept in, so when we were done with the museum it was tea time already. And so we went to Conditori La Glace for tea!

Afterwards we went to Tivoli Gardens, the second oldest amusement park in the world.

Normally I don't go to amusement parks when I travel, but I am very glad that we went to Tivoli Gardens. There is the ride which goes really high up, offering a great view of Copenhagen. I don't think you can get that view anywhere else!


The ride from below. I was not crazy enough to take a photo on it.

Without a proper lunch, both of us were craving real food. Cate suggested sushi, to which I nodded enthusiastically. We went on to have this absolutely amazing meal at Sticks'n'Sushi.

I am still thinking about that meal! Too bad they don't have Sticks'n'Sushi in the US.

Monday, November 10, 2014

Droidcon London 2014

I had a great time speaking at Droidcon London 2012, and I am very happy to go back this year.

First thing first: gotta love these super cute icons!

Barcamp

Day 1 is barcamp. Everyone got a chance to get on stage and pitch their session.

There were quite a variety of topics. I was entertained by a hilarious app clinic, killed the refresh button with SyncAdapter, and discovered that you can address any 3mx3m grid in the world with 3 words.

Practical Best Practices

We rounded up the day with a satire talk by Chet Haase: Practicing Practical Best Practices for Software Development Practitioners.

Lollipop

Day 2 is presentations, starting with keynote from Chet the Googler, not to be confused with Chet the consultant from the day before, who wore a tie.

Chet the consultant (Credit: Skills Matter)
Chet the Googler (Credit: Skills Matter)

Chet told us about What's New in Android, followed by Chris and Nick with more Lollipop tips:

Design

Next I learnt about design from Juhani Lehtimaeki and Taylor Ling.

Graphics trilogy

In the afternoon, there were three talks on graphics, including mine.

Mark opened the trilogy with Graphical Magic. And by magic I meant he was setting stuff on fire!

With that great opening, Mark went on to show us how to do image manipulation programmatically.

Next in the trilogy was my talk, Fun with Android Shaders and Filters, where I showed more image processing techniques.


Slides: http://chiuki.github.io/android-shaders-filters

And finally, Sebastiano Poggi covered the Skia pipeline in Framing the Canvas.

Best part: The people

Droidcon London is one of my favorite conferences. The talks are great, but more importantly I get to hang out with really awesome people.


Thank you everyone for the wonderful conference!

Monday, October 20, 2014

First look at AnimatedVectorDrawable

Android Lollipop introduced a lot of sweet new classes. The one that caught my eye is AnimatedVectorDrawable, and I decided to check it out right away.

Example from Documentation

The documentation included an example, so I created the files as instructed: res/drawable/vectordrawable.xml, res/drawable/avd.xml, res/anim/rotation.xml and res/anim/path_morph.xml

Now what? There are many ways to use a Drawable. How about in a TextView?

<TextView
  xmlns:android="http://schemas.android.com/apk/res/android"
  android:layout_width="wrap_content"
  android:layout_height="wrap_content"
  android:text="@string/example_from_documentation"
  android:drawableBottom="@drawable/avd"/>

No animation yet. Let's start it.

for (Drawable drawable : textView.getCompoundDrawables()) {
  if (drawable instanceof Animatable) {
    ((Animatable) drawable).start();
  }
}

And voilà! Animation. But what is it? Let's step it through.

res/drawable/vectordrawable.xml

<vector
  xmlns:android="http://schemas.android.com/apk/res/android"
  android:height="64dp"
  android:width="64dp"
  android:viewportHeight="600"
  android:viewportWidth="600" >
  <group
    android:name="rotationGroup"
    android:pivotX="300.0"
    android:pivotY="300.0"
    android:rotation="45.0" >
    <path
      android:name="v"
      android:fillColor="#000000"
      android:pathData="M300,70 l 0,-70 70,70 0,0 -70,70z" />
  </group>
</vector>

This is the VectorDrawable. The path defines a triangle, and the group rotates it by 45 degrees.

res/drawable/avd.xml

<animated-vector
  xmlns:android="http://schemas.android.com/apk/res/android"
  android:drawable="@drawable/vectordrawable" >
  <target
    android:name="rotationGroup"
    android:animation="@anim/rotation" />
  <target
    android:name="v"
    android:animation="@anim/path_morph" />
</animated-vector>

Next we have avd.xml, which rotates the group and morphs the path.

res/anim/rotation.xml

<objectAnimator
  xmlns:android="http://schemas.android.com/apk/res/android"
  android:duration="6000"
  android:propertyName="rotation"
  android:valueFrom="0"
  android:valueTo="360" />

res/anim/path_morph.xml

<set
  xmlns:android="http://schemas.android.com/apk/res/android">
  <objectAnimator
    android:duration="3000"
    android:propertyName="pathData"
    android:valueFrom="M300,70 l 0,-70 70,70 0,0   -70,70z"
      android:valueTo="M300,70 l 0,-70 70,0  0,140 -70,0 z"
    android:valueType="pathType"/>
</set>

The rotation starts from 0 degrees. But since our drawable is initially rotated at 45 degrees, there is a sudden jump when the animation starts. It takes 6000ms to reach 360 degrees. Meanwhile, the path morphs from a triangle to a rectangle in 3000ms, half the time. So, at 180 degrees, the morph is complete.

Phew, that was not obvious at all. To understand what was happening, I split the rotation and the path morph to observe them separately.

Clock

After trying the example, I wanted to make my own, to see if I can come up with some simple animations that makes sense. I like the idea of animating different parts of the VectorDrawable, and made a clock.

The hours arm rotates from 9 o'clock to 5 o'clock while the minutes arm goes around from 0 to 60 minutes. The duration of rotations are set differently to give them different speeds.

Smiling face

Next I played with path morph. What is a path morph that makes sense? Let's make a sad face into a happy face!

Points to note

  1. The <vector> tag must have android:height and android:width to define the intrinsic width and height of the VectorDrawable. Your app will crash if you skip them.
  2. If your VectorDrawable has a smaller android:height or android:width than when you use them say in an ImageView, your graphic will look pixelated.
  3. To morph from one path to another, the paths must be compatible. They need to have the exact same length of commands, and exact same length of parameters for each command.

I am very excited about VectorDrawable and AnimatedVectorDrawable. Scalable graphics FTW!

Source code: https://github.com/chiuki/animated-vector-drawable

Friday, October 10, 2014

Pan-CJK font on Ubuntu

Ubuntu supports Chinese out of the box, kind of:

See those rectangles? Some characters are not rendered, but enough are, so I left it like that for months. But it was starting to annoying me, and I finally looked into it. Turned out some fonts are missing. I installed ttf-arphic-ukai, which got rid of the rectangles, but I didn't like the way it looked. ttf-arphic-uming was not satisfactory either. As I agonized over which of the two to pick, I remembered that Google and Adobe announced a Pan-CJK font a while ago. Here is how to install it on Ubuntu:

  1. Download the zip file from the Adboe github page.
  2. Unzip it to a temporary directory.
  3. Copy the OTF directory to /usr/share/fonts/. I created a subdirectory opentype/source-han-sans, but you can put them anywhere you want.

Restart your browser, and voilà, all the characters are rendered in a beautiful font:

Wednesday, October 8, 2014

Localizing the globe

You have probably seen this at the beginning of a movie:

I am always caught by surprise when the globe stops spinning, expecting to go further. Watching it closely, I realized why: it stops at the Americas. I grew up in Hong Kong, where world maps look like this:

What's special about it? The center of the map is the Pacific Ocean. In my mind, that is the focal point of the globe, so I felt unsatisfied when the Universal globe stops spinning at the Americas.

I found it ironic that the globe, being the obvious icon for a global society, is actually usually localized. And today I found a delightful case of a localized globe - the notification icon in the top right corner of Facebook:

I never paid much attention to it, but my friend Corey is visiting Sweden, and noticed that her icon changed from showing the Americas:

To Europe, Africa and Asia:

Very subtle, but very cool!