Showing posts with label formula. Show all posts

Monday, March 21, 2016

How to make a podcast transcript

I really enjoyed my chat with Saron on the CodeNewbie podcast, and wanted to circulate the content more widely. Audio is great, but text is more searchable and thus more discoverable, so I wanted to transcribe the show.

Automatic transcript via YouTube

YouTube transcribes for free, all you need is a video. I took the podcast and made a video with a black screen, and uploaded to YouTube. The transcript got maybe 70% right, but not enough to actually understand the show without listening.

1
00:00:00,000 --> 00:00:12,259
welcome to the gurney podcast when we
talk to people on their current journey

2
00:00:12,259 --> 00:00:16,779
notes about being you on yours I'm your
house around today on the show I'm so

3
00:00:16,779 --> 00:00:21,060
excited to have to teach an independent
Android developer and creator of

4
00:00:21,060 --> 00:00:28,230
technically speaking to be on as a high
so you do a lot of stuff but the main

Correct the transcript via Fiverr

I did not want to correct the transcript myself, so I outsourced it on Fiverr. I provided the link to download the podcast, the .srt transcript from YouTube, and some extra information:

  1. The name of the show is CodeNewbie
  2. The host is Saron Yitbarek
  3. The guest is Chiu-Ki Chan (aka me!)
  4. Technically Speaking is the name of the newsletter we talked about. Please capitalize.

I got the cleaned transcript the next day, for $30 ($31.5 including fees):

1
00:00:00,000 --> 00:00:12,259
SARON: Welcome to the CodeNewbie podcast, where we
talk to people on their coding journey

2
00:00:12,259 --> 00:00:16,779
in hopes of helping you on yours. I'm your
host, Saron. Today on the show I'm so

3
00:00:16,779 --> 00:00:21,060
excited to have Chiu-Ki Chan, independent
Android developer and creator of

4
00:00:21,060 --> 00:00:28,230
Technically Speaking. Chiu-Ki, you want to say hi?
CHIU-KI: Hello! SARON: So you do a lot of stuff, but the main

Convert to HTML

The transcript has line breaks that makes it a bit hard to read. I wrote a Python script to convert that to Markdown, then open it in Atom to get the HTML.

Add links and Publish

This is optional, but when I pasted the HTML to my blog I added some links as well.

You can see the results here: blog.sqisland.com/2016/03/codenewbie-podcast-visibility.html

Monday, March 23, 2015

Sketchnoting: An Engineer's Approach

Write/Speak/Code is the first conference I tried sketchnoting, and people loved it. I was really surprised because I still consider myself someone who cannot draw, but somehow I am good at sketchnoting. How come?

Constraint satisfaction problem

Naturally, I will explain my approach with a sketchnote:

When I took Alexis' sketchnotes class three years ago, I was really hung up on the idea that I needed to draw. The repertoire of shapes and objects that I can draw is really small, so I never actually tried sketchnoting after the class.

What changed? I flipped the problem around. I phrased it as a constraint satisfaction problem. I am using a small toolbox to express ideas I heard. And as an engineer, I am extremely good at that.

In the sketchnote above, I wanted to convey the idea that illustrations do not need to be realistic. At first I wanted to draw two trees, one realistic, one not. But alas, I cannot draw a realistic tree. Instead of giving up, I worked around by drawing a box with a dotted line to represent the realistic tree that I am unable to draw. Problem solved.

I am not kidding when I say my toolbox is small. You can see it in the sketchnote. The plain old notes vs sketchnotes part. That is literally my toolbox.

Use a pen

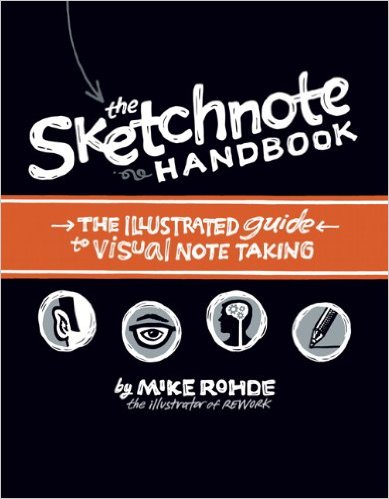
The other breakthrough came when I saw The Sketchnote Handbook by Mike Rohde in my local library:

The most important thing I picked up from the book is to use pen instead of pencil. This forces me to always make progress instead of erasing and re-drawing and second-guessing myself. It also makes me more forgiving of my mistakes, and come up with creative ways to fix them.

In the toolbox about bullet lists, I made two bullets with stars, because a single bullet doesn't make a list. And then I realized that I have nothing to more to say. What to do? The second star was already drawn. With ink.

I ended up writing "There is no second point" next to the second star. And you know what? It now emphasizes the fact that it doesn't take much to make sketchnotes.

A lot of serendipity came from using a pen and being forced to make things work.

Find your style

I really enjoyed the The Sketchnote Handbook because it includes examples from many sketchnoters. I pick and choose techniques that works for me:

  • Some sketchnotes are very free form, popping images left and right seemingly randomly. That terrifies me. But many examples use a grid style. I came up with my own layout algorithm: top to bottom, and if an item took too little horizontal space, put something next to it. This is very similar to traditional note taking, just using a bit more horizontal space. I can do that.
  • Some sketchnotes fill the whole page, and the pressure to do so paralyzes me. But many examples have whitespace between the items, and that is totally okay.
  • The book recommended using a vertical layout for panels, drawing the face of one panelist on each column. There is no way I can draw portraits. So I skipped that part. But it also showed a few simple ways to draw people. Now Starfish Man is a regular cast member in my sketchnotes.

Share

This is the most potent motivator: Twitter. You know how some people take a screenshot of a block of text to get around the 140 character limit? That looks stupid. But I can totally post a sketchnote to stuff more content into a tweet. And it looks awesome. So awesome that I get lots and lots of retweets, which gave me the confidence to do more sketchnotes, which gets more retweets.


Gotta love that positive feedback loop!

Thursday, March 19, 2015

Blogging formula: Conference reports

I wrote about my formula for writing technical articles. I also have one for trip reports, to talk about conferences I attended. Having a fixed structure means I can plug in the content from the conference and publish the blog post a day or two after the conferences ended, while it is still fresh on people's minds.

Here is my formula, using Øredev as an example.

1. Introduction

I introduce the event many different ways:

  • Explain why I was there.
  • If I was speaking, talk a bit about the CFP process.
  • Pull out one interesting thing from the conference.

Here is what I said about Øredev:

When Cate and I was touring Copenhagen, we talked about how we got into public speaking. One thing led to another, and we decided to publish a newsletter together. We had a little bit of time on Monday before Øredev, so we put together our first issue in the hotel lobby!

2. Highlights

I point out things that I enjoyed. This is pretty easy because I tweet during the conference, so I just embed the tweets in my blog. I also search for the conference hashtag and include other people's tweets.

I also include photos from the events. Photos are great because they take so much space that you post looks rich even if you did not write many words. Same goes for embedded tweets.

Selected tweets from Øredev:

3. My talks

If I was speaking, I mention my talks, embedding or linking to slides and videos if available. Usually I keep this pretty short, assuming people can check out the slides or videos if they are interested.

My talks at Øredev:

4. Conclusion

Quick summary of my general impression, usually just a sentence or two. This is what I said about Øredev:

Tack så mycket, Øredev!

Exercise for the reader to figure out what it means :)

Saturday, January 24, 2015

Moar technical articles!

You need to write more technical articles.

Yes, you.

I could guilt you into doing it. I could tell you that you have benefited from other people's sharing so much that it is time for you to give back.

But instead I will tell you what is in it for you: Job security.

Your real résumé

The classic first step to get a job is to prepare a résumé. It could lead you to an interview if you keyword-stuff it the right way. But nowadays employers are turning to the internet to cross check if you are who you claim. A repertoire of technical articles is a solid way to show that you know your stuff, and more importantly, you can communicate.

But what do I write?

I knew you would say that. While I have no guaranteed formula that works for everyone, I can share how I make writing technical articles a part of my normal workflow.

  1. Experiment on a clean slate
    Whenever I need to incorporate an unfamiliar technology into my work, I do not do it directly in my main project. Instead, I create a brand new project and implement the minimal setup to understand how it works.

  2. Build it up step by step
    Once I get the minimal setup working, I add extra logic to get to what I need. But instead of overwriting the minimal setup, I make a copy so that I can explain the steps later. For example in Android apps I make my MainActivity a list of activities, each corresponding to a step.
  3. Integrate into the main project
    When the sample project has all the functionalities I need, I put it into my main project. It may interact with my existing code in unexpected ways, so I tweak until it works.
  4. Write the article
    After the coding is done I write the article. This is the structure I use:
    1. A back story of what I was trying to do
    2. Outline the steps I took with code snippets and screenshots
    3. Explain the problems I encountered along the way, and how I solved them
    4. Link to source code on github
  5. Push the sample project to github
    I don't publish my source code until the article is written because sometimes I thought of a better way of doing things while explaining my method in writing. Once I am happy with the article, I push my repository to github, publish the article, then add a link from the README of the github repository back to the article.
  6. Share on social network
    After everything is published, I post a link to Twitter and Google+ with a screenshot as the teaser.

End result

Here is a sample article: Partial SlidingPaneLayout

And how I shared it:

Good for you, good for others

I stumbled upon this workflow by accident. I used to stick the new technology straight into my main project, failed to make it work, and unable to pinpoint why. With a brand new project I can focus on the new stuff, work out all the kinks before I introduce the extra complexity of my main project.

Once I figured out how it works, I could have just thrown away the sample project. But what a waste! Instead I push it to github, and suddenly I am an open source contributor. Sweet!

Writing the article is a bit of extra work, but so very worth it. It gives me credibility. It lets people know that I know my tech, and I know how to explain it. Icing on the cake? It helps other people too!